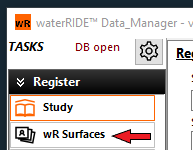
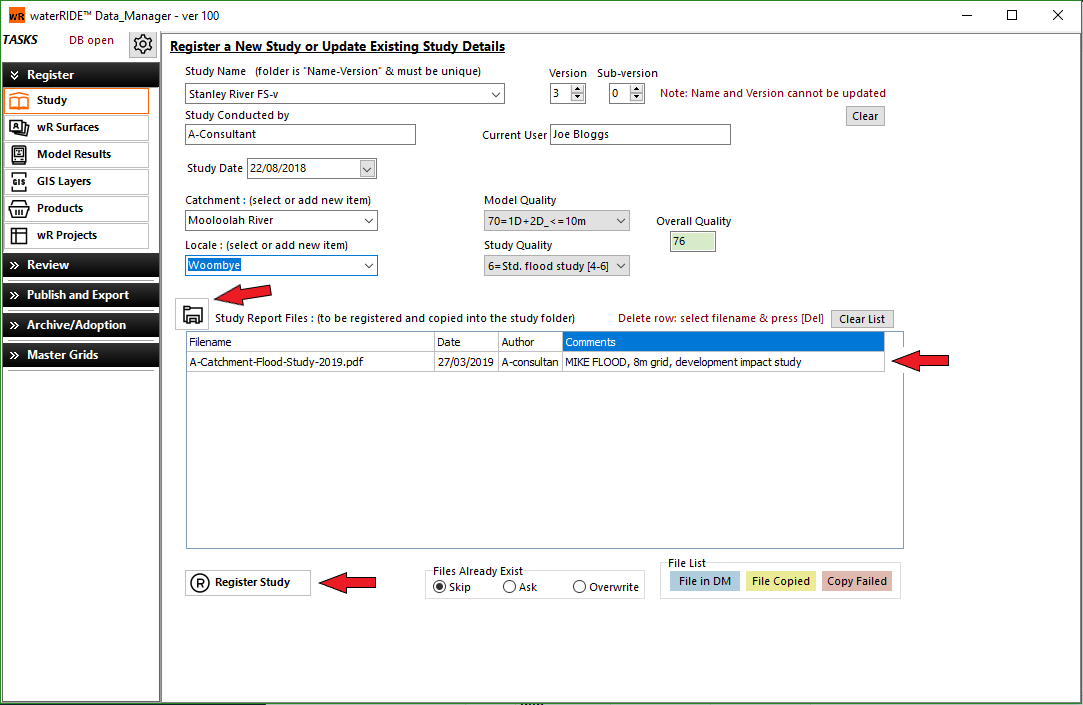
The Study registration menu is used to register a New Study into the database or to update/edit a study that is already registered.
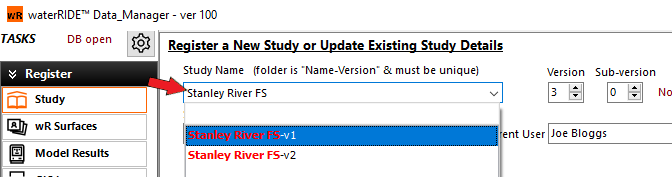
To register a New Study simply begin typing the name of the study in the Study Name box. If a study with the same name already exists it will appear in the drop down box below along with the Version number. If a study of the same name exists ensure you chose a new concurrent version number as it is important that each study has a unique study ID.
To modify an Existing Study simply begin typing the name of the study and a drop down will appear with the search query results from the input text. Once you select the correct study you can then modify the details using the steps below.
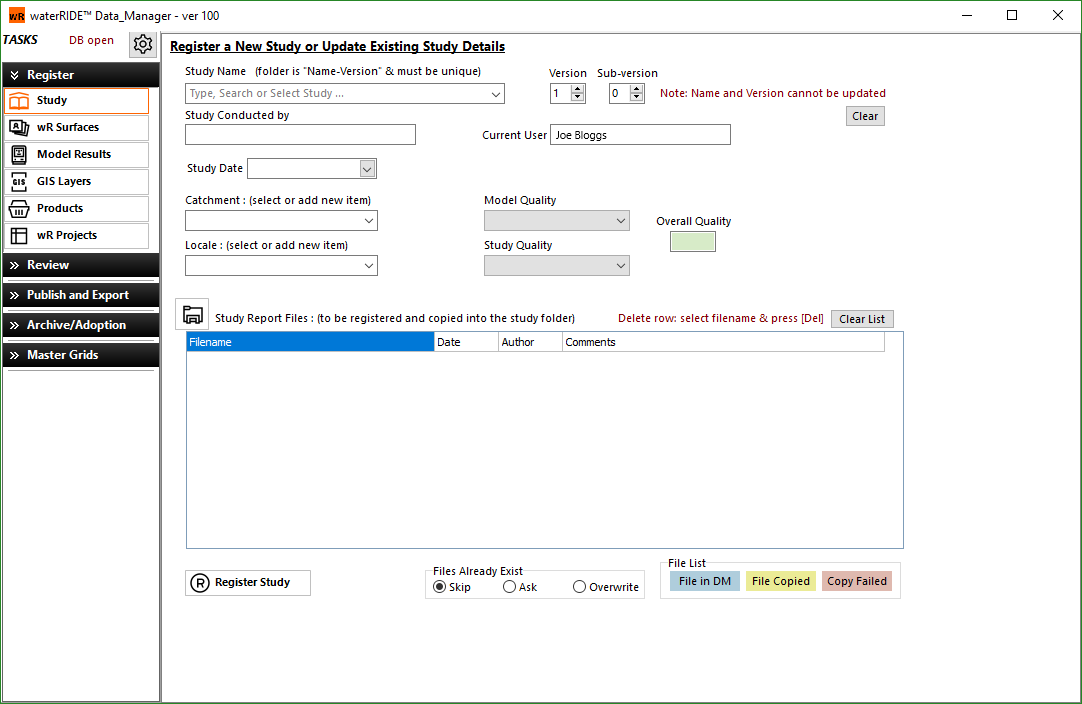
Once a Study Name and Version are decided you can begin entering some of the meta data associated with the study:
1.Study Conducted By - Enter the name of the consultant or organisation that produced the study.
![]()
2.Current User - This defaults to the ID of the currently logged in user ID. This can be manually updated as required.
![]()
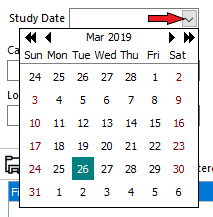
3.Study Date - You can chose to either manually enter the date the study was conducted or select the drop down arrow to activate the date picker.
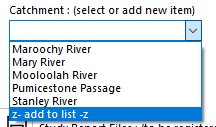
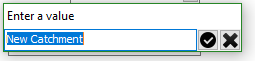
4.Catchment - Select the catchment associated with the study. If the catchment is not listed already, simply select the "z- add to list -z" option at the bottom and type in the new catchment name into the box that appears. Once you are happy with the new catchment name press the tick and it will be added to the database.
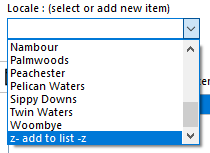
5.Locale - Select the locale associated with the study. This could be a suburb or feature of the catchment that will help identify where the study is located. This parameter will be useful for users who may not be familiar with the catchment location. If the locale is not listed already, simply select the "z- add to list -z" option at the bottom and type in the new name into the box that appears. Once you are happy with the new name press the tick and it will be added to the database.

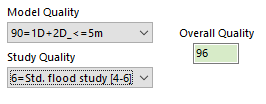
6.Model Quality - The model quality is an indicative value associated to the study based on how detailed the hydraulic model is. Select the appropriate model quality option using the drop down menu.
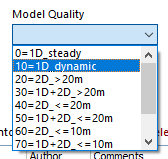
Some examples of model quality types are as follows:
• 0 = 1D_steady - A steady state 1D model such as a basic HEC-RAS 1D quasi-steady model.
• 10 = 1D_dynamic - A time varying 1D model such as a MIKE11 or ESTUARY 1D model.
• 20 = 2D_>20m - A full 2D model (excluding 1D elements) with a grid or element size greater than 20m such as a regional TUFLOW FV model excluding 1D features.
• 30 = 1D+2D_>20m - A 2D model with 1D features defined with a grid or element size greater than 20m such as a regional MIKE FLOOD model.
• 40 = 2D_<=20m - A full 2D model (excluding 1D elements) with a grid or element size equal to or less than 20m and greater than 10m.
• 50 = 1D+2D_<=20m - A 2D model with 1D features defined with a grid or element size equal to or less than 20m and greater than 10m.
• 60 = 2D_<=10m - A full 2D model (excluding 1D elements) with a grid or element size equal to or less than 10m and greater than 5m.
• 70 = 1D+2D_<=10m - A 2D model with 1D features defined with a grid or element size equal to or less than 10m and greater than 5m.
• 80 = 2D_<=5m - A full 2D model (excluding 1D elements) with a grid or element size equal to or less than 5m and greater than 3m.
• 90 = 1D+2D_<=5m - A 2D model with 1D features defined with a grid or element size equal to or less than 5m and greater than 3m.
• 100 = 2D_<=3m - A full 2D model (excluding 1D elements) with a grid or element size equal to or less than 3m.
7.Study Quality - This is a subjective value to be determined by the user based on the quality of the study. The user can scale the study quality based on things such as the model methodology, model purpose, calibration results, etc.
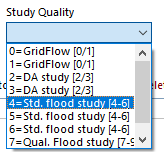
Some examples of study quality ranges are as follows:
• 0-1 - A GridFlow model.
• 2-3 - A model created for development assessment purposes.
• 4-6 - A standard flood study.
• 7-9 - A flood study with a high attention to detail.
8.Overall Quality - This value is the sum of the model and study quality values.
The next step is to include any documents associated with the study such as calibration or flood study reports. To browse and select any associated document files use the ![]() button. After the files have been selected they will appear in the table.
button. After the files have been selected they will appear in the table.
To delete any unwanted files, simply select the filename and press the [Del] key on your keyboard.
Once the files have been added, update the study date and author details along with any comments related to the document.
After all fields have been completed in the form press the ![]() button to complete the registration. This will automatically create the new study folder in the Root Directory and copy any selected report files listed. The File List legend below the table indicates the highlight color used for the associated documents that have been copied successfully or not.
button to complete the registration. This will automatically create the new study folder in the Root Directory and copy any selected report files listed. The File List legend below the table indicates the highlight color used for the associated documents that have been copied successfully or not.
Once the study has been registered the next step in the process is to add the associated waterRIDE surface files to the data manager.