Selecting the Differences menu will display the following dialog.
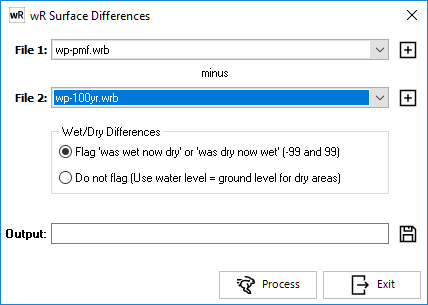
The objective of this process is to create a difference surface between two hydraulic/terrain surfaces to look at increases between floods or to visualise impacts such as from a proposed development by comparing the pre and post model runs. To be most effective the two waterRIDE™ surface files should include the full suite of terrain and hydraulic parameters and, as indicated in the dialog, they do not necessarily need to be on the same spatial framework.
The difference will be File 1 minus File 2. For development impact assessment, this means that File 1 will be the proposed conditions and File 2 will be existing conditions.
Wet/Dry Differences - Allows the user to specify how differences should be calculated when one network is wet and the other dry (or vice versa):
Flag 'Wet to Dry' or 'Dry to Wet' - when differences for a node/cell are calculated and network 1 is dry but network 2 is wet, then '-99' will be written (i.e. the water level have decreased by such a 'large' amount that the area is now dry). If network 1 is wet but network 2 is dry, then '99' will be written (i.e. the water level has increased by such a 'large' amount that the area is now wet). Differences in velocity, VxD etc are set to 0.0.
Use Water Level = Ground Level - when differences are calculated for a node/cell, if one of the networks is dry, then the difference in water level is set to the depth at the wet node/cell (essentially ground level = water level for the dry area). It is important to be aware that this is NOT the actual water level difference, but rather the water depth difference.
Example: Consider that a 0.01m increase in water level is considered negligible for a development. If a 0.01m increase in water level inundates an area that was previously dry, then one could argue that the 0.01m increase in level is far from negligible.
It is up to the user to decide which method they prefer to use. A combination of both approaches may be ideal in that it will show those areas that are now wet/dry, as well as showing the overall magnitude of change in water levels.
The differences are only determined from the peak values and will include terrain, water level and velocity differences. The resulting difference surfaces are best thematically mapped with a difference palette and an equidistant range either side of zero, eg. -1 to 1 in 0.1 increments. A difference palette can readily be created as shown below. Set the darkest and lightest of the two colours then blend between them. For further details on setting palette, refer to The Legend & Symbol Palette Editor. This new palette can be saved as an .smp file for future use. You may also wish to include transparent (clear) colours in the palette.
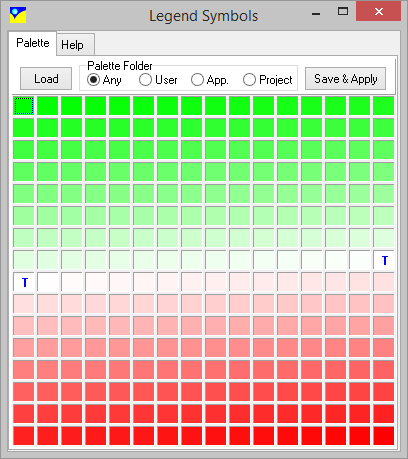
A sample blended palette (green to red via white (clear))