Legends are created from colour palette files, denoted as *.smp files. These *.smp files can be created and modified using the ‘Edit Legend Symbols and Palette’ tool in waterRIDE™.
![]() The legend and symbol editor button opens a dialog which allows a colour palette to be created or edited, and if the active layer contains point data, legend editor tab is also opened.
The legend and symbol editor button opens a dialog which allows a colour palette to be created or edited, and if the active layer contains point data, legend editor tab is also opened.
If the GIS layer contains point data the legend tab will be the first tab displayed.
Legend Tab
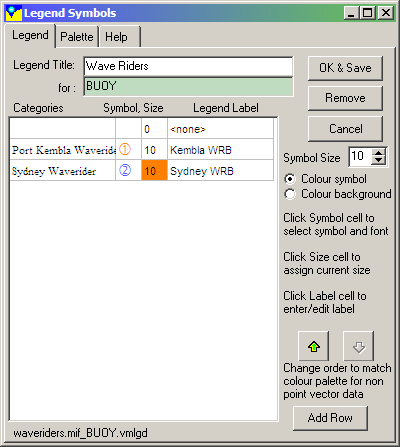
The objective of the legend editor is to enable symbol types and sizes to be a part of the thematic mapping of point data instead of just colour. This dialog provides a list of all the unique values in the active data field and allows the user to manually specify for each field value: a symbol from a Windows font, the size of the symbol, and the label to appear in the legend. The overall legend title can also be set to override the field name and the order can be changed to suit the palette being used. Additional rows can be added if a field value is known to exist, but is not present in the layer being setup.
Once saved, this symbology reference data is stored in a .vmlgd file created from the GIS layer filename and the field name, e.g. 'Filename_Fieldname.vmlgd'. This symbology file will be automatically used whenever this layer and this fieldname are used in a waterRIDE™ project.
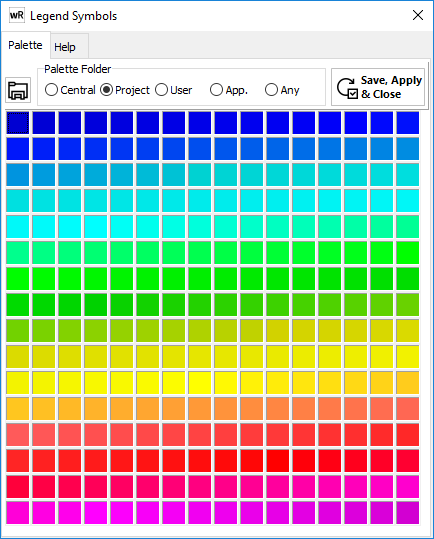
Palette Editor
If the layer is a surface layer, the colour palette in use by the active layer, unless it is <default> will be automatically loaded into the palette grid.
The Palette Editor consists of a 16x16 grid of colour boxes, initially all black unless a palette has been selected.
Two basic methods can be used to create new colour palettes:
- assigning individual colours
- using the blend feature to create smooth transition between colours
Each individual box in the grid can have a colour assigned by the user. This is done by double-clicking on one of the boxes and choosing a colour from the colour table.
Alternatively the blend feature of the Legend Editor can be used to interpolate between two or more colours to create a smooth transition form one colour to the next. This process is illustrated below.
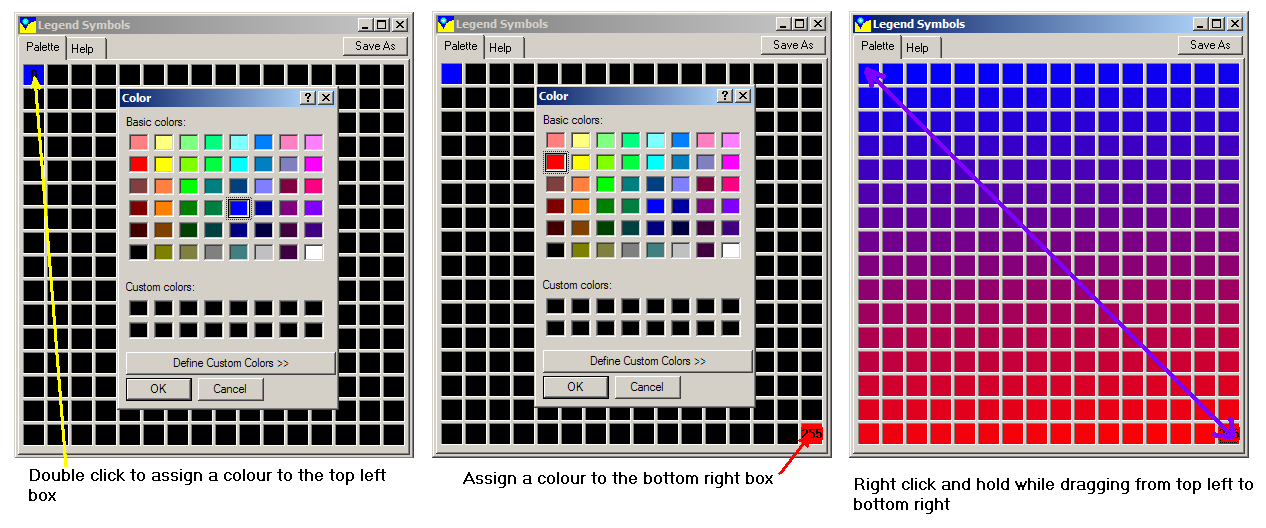
Using the blend feature with two colours
To create a smooth transition of colours, first define the first and last colours you would like to use. Then right-click in the first box and hold the mouse button down while dragging the pointer to the second defined colour. This process will fill all the boxes between the start and finish with a range of colours between the two originally defined colours. Refer below for an example of blending two colours.
Colours can be assigned to each individual box in the palette as described above, or the palette can be automatically filled with random colours. Random colours are selected simply by holding down the CTRL+R.
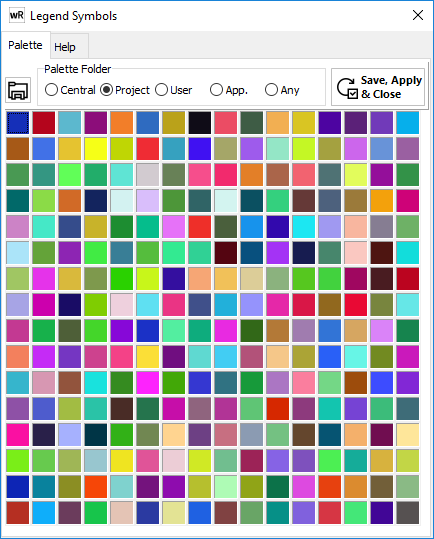
Example of random colour palette
Clear Legend Colours

From v8 onwards, a legend can be configured to contain clear (or completely transparent) "colours". These are set by right clicking on each cell of the colour palette and, once set, are denoted with the letter "T" in the cell.
Saving and Managing Palettes
![]()
Palettes are saved as *.smp files. These files can reside in any location and will be refernced by the waterRIDE project. By default, they are saved in a "palettes" folder underneath the project file. However, centrally managing projects (via the Enterprise central folder, or locally in a user folder) can be a useful way of re-using palettes.
Saving
The help tab inside the legend/palette editor contains more instructions and short-cut keys on using the Palette Editor.