The general Surface Interpolation tool allows the user to interpolate a new surface from two surfaces. For example, and indicative 50yr surface could be interpolated using the 20yr and 100yr surfaces. Alternatively, a surface of 10.25m at the "bridge gauge" could be interpolated.
Interpolation can be driven by (at a known location):
•Absolute levels
•Flows
•Surface ARI's
The above values can be entered manually, or automatically read from the water surfaces themselves (at a user defined location or using a GIS layer)
This tool utilises the same interpolation algorithm used for single gauge flood forecasting. As such, the lower surface must be stretched to the extent of the upper surface to ensure full interpolation, and both surfaces must have the same spatial framework (grid or TIN)
Interpolation Using Manually Entered Parameters
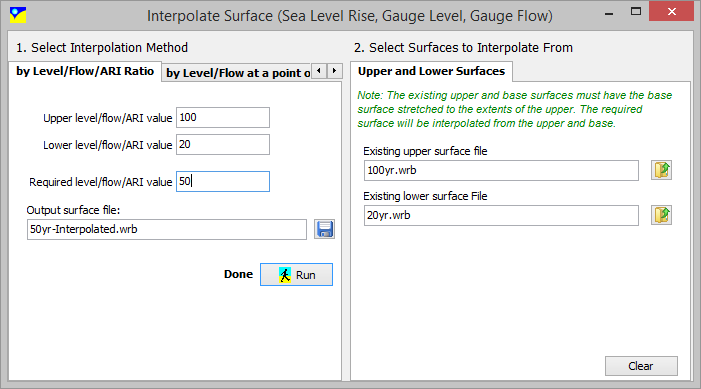
Interpolation Method:
Select the "by Level/Flow/ARI Ratio" tab.
Upper Level/Flow/ARI value: The relative value for the upper surface at a known location
Lower Level/Flow/ARI value: The relative value for the lower surface at a known location
Required Level/Flow/ARI value: The desired value for the interpolated surface
Output surface File: The waterRIDE™ file to save the interpolated surface to.
Surfaces To Interpolate From:
Existing Upper Surface File: The upper water surface to use in the interpolation.
Existing Lower Surface File: The lower water surface to use in the interpolation.
Click the Run button to execute the interpolation.
Read Level/Flow Automatically From Surfaces
In this tool, the relative magnitudes at which the interpolation is carried out against are read from the relevant surfaces. A location at which to read the surfaces must be specified, by either manually drawing a point/line, or using an external GIS layer. The user then enters the desired flow or level. If a full library of source surfaces is available, the tool will automatically determine which surfaces to use in the interpolation. Otherwise, the user should specify the surfaces to use. The automated approach can be particularly useful if you need, say, a "10.2m at the gauge" surface, but are unsure which surfaces would span this value.
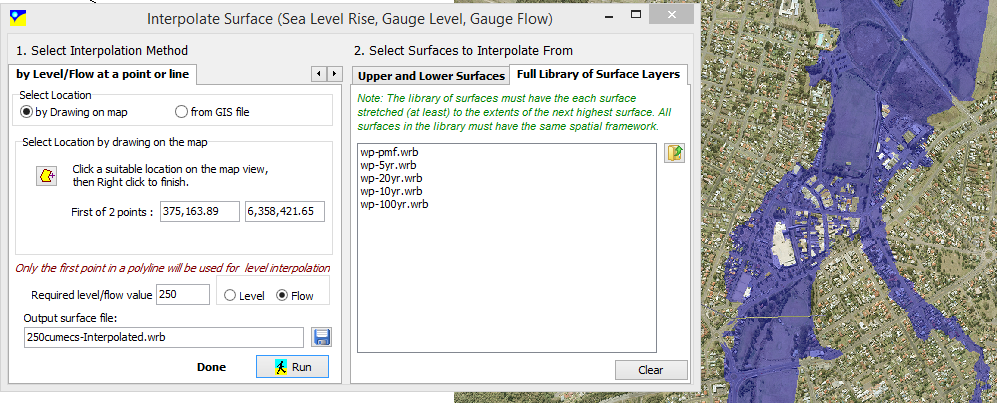
Interpolation Method:
Select the "by Level/Flow at a point or line" tab.
Either draw a point (level) or cross section (flow) on the map window, or specify an external GIS file containing the same. This is the location at which the relevant parameter will be read from the water surfaces. Note that only the first point/line will be used. If using an external GIS file, you will need to specify the file to use, a field containing unique values for each object, and the field value of the object you wish to use as the point of reference for the interpolation.
Required Level/Flow value: Specify the desired value for the interpolated surface and whether it is "level" or "flow".
Output surface File: The waterRIDE™ file to save the interpolated surface to.
Surfaces To Interpolate From:
Either:
Existing Upper Surface File: The upper water surface to use in the interpolation.
Existing Lower Surface File: The lower water surface to use in the interpolation.
OR:
Load the full range of surfaces from which waterRIDE™ will select the appropriate surfaces to use.
Click the Run button to execute the interpolation.