Views provide access to layers. Layers can be displayed (basic), thematically mapped (thematic), or interrogated (active).
The View Contents panel reflects the settings for the view that was selected in the Table of Contents.
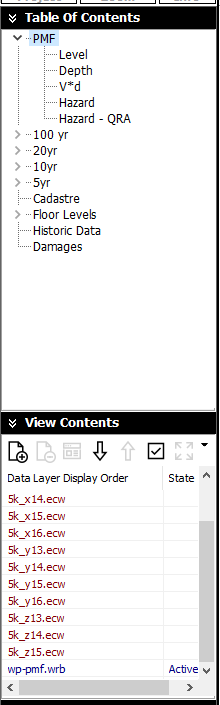
In the example above, the 'PMF' view heading was selected from the TOC panel (double click to open the View Contents directly).
The View Contents panel contains tools for changing the layout/content of the view. The layers in the view are displayed in draw order (from top to bottom - the opposite of conventional GIS), and are also colour coded according to their data type:
![]() Add data layer: Opens the ‘Data Layers’ dialogue allowing the user to tick on or off the various layers, lift or lower them to change the order of drawing (see below), or adding a new layer (see also Adding Layers to a View).
Add data layer: Opens the ‘Data Layers’ dialogue allowing the user to tick on or off the various layers, lift or lower them to change the order of drawing (see below), or adding a new layer (see also Adding Layers to a View).
![]() Drop data layer: Gives the user the option to remove a data layer from the current view or entire project (if it is not used in any other views). Clicking 'Yes' removes the layer from the entire project, clicking 'No' turns off the layer from the current view only, while 'Cancel' cancels the operation (see also Removing a Data Layer).
Drop data layer: Gives the user the option to remove a data layer from the current view or entire project (if it is not used in any other views). Clicking 'Yes' removes the layer from the entire project, clicking 'No' turns off the layer from the current view only, while 'Cancel' cancels the operation (see also Removing a Data Layer).
![]() Lift data layer: Moves the selected data layer closer to the ‘surface’ of a view (i.e. if a layer is moved to the bottom of the list, it will be drawn last, ‘on top of’ all other layers) (see also Changing the Display Order of Layers).
Lift data layer: Moves the selected data layer closer to the ‘surface’ of a view (i.e. if a layer is moved to the bottom of the list, it will be drawn last, ‘on top of’ all other layers) (see also Changing the Display Order of Layers).
![]() Lower data layer: Moves the selected data layer closer to the ‘bottom’ of a view (i.e. if a layer is moved to the top of the list, it will be drawn first, ‘underneath’ all other layers) (see also Changing the Display Order of Layers).
Lower data layer: Moves the selected data layer closer to the ‘bottom’ of a view (i.e. if a layer is moved to the top of the list, it will be drawn first, ‘underneath’ all other layers) (see also Changing the Display Order of Layers).
![]() Display styles: Opens the display styles dialog allowing changes to the basic styles and projection of layers (point, line and polygon colours, styles and fills) as well as to thematic layers and time sequence data (see also Layer Display Styles). This can also be opened by double-clicking (or right clicking) on a layer in the layers list.
Display styles: Opens the display styles dialog allowing changes to the basic styles and projection of layers (point, line and polygon colours, styles and fills) as well as to thematic layers and time sequence data (see also Layer Display Styles). This can also be opened by double-clicking (or right clicking) on a layer in the layers list.
![]() Set as default view: Ticking this box sets the current zoom and position settings as the default values, i.e. if ticked, the next time the view is shown, it will be using this setting. If this box is not ticked, the view will revert back to the last saved settings.
Set as default view: Ticking this box sets the current zoom and position settings as the default values, i.e. if ticked, the next time the view is shown, it will be using this setting. If this box is not ticked, the view will revert back to the last saved settings.
![]() Set layer extent for the View: Selecting a layer and clicking this tool will zoom to the selected layer’s extents. The ‘Set as default view’ box could then be ticked to preserve this setting (see also Layer Display Styles).
Set layer extent for the View: Selecting a layer and clicking this tool will zoom to the selected layer’s extents. The ‘Set as default view’ box could then be ticked to preserve this setting (see also Layer Display Styles).
![]() Show extra view settings: Provides access to additional view settings
Show extra view settings: Provides access to additional view settings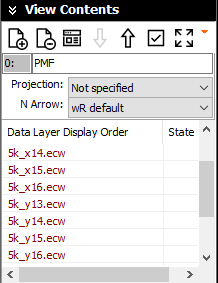
![]() View Name: The name of the current view can be edited directly in the edit box.
View Name: The name of the current view can be edited directly in the edit box.
![]() View Projection: waterRIDE™ allows the user to select a variety of different projections for which the current view will be displayed in. This allows different files using different projections to be displayed in a single projection. The waterRIDE™ program re-projects the files to the required projection provided that they are not image files, and that the original projection of the file is specified.
View Projection: waterRIDE™ allows the user to select a variety of different projections for which the current view will be displayed in. This allows different files using different projections to be displayed in a single projection. The waterRIDE™ program re-projects the files to the required projection provided that they are not image files, and that the original projection of the file is specified.
This means that the projection of the view should be the same as any image files as the images are not re-projected, for speed and quality reasons. The projection of individual layers can be changed in the Display Styles, or on the Layer Display form.
Reprojecting a layer increases the time taken to display the layer (which can be significant for very large layers). To increase performance, it is preferable to ensure all layers are in the same projection.
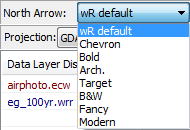 North Arrow: Sets the North Arrow display style for the current view