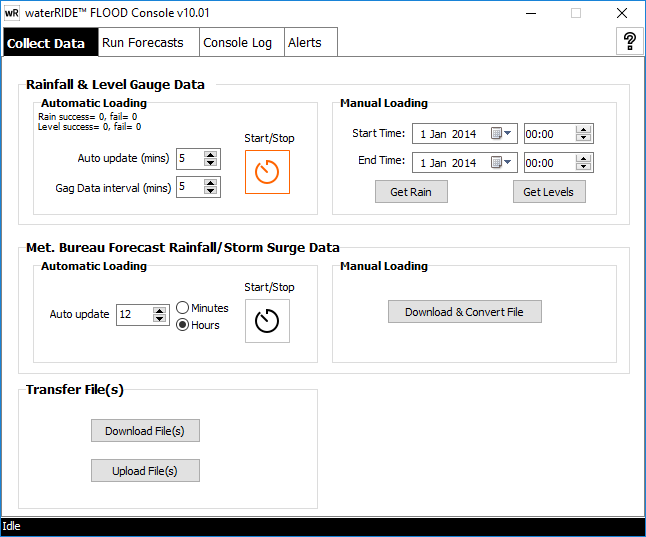
The waterRIDE™ Forecast Console is designed to automate the collection and update of datasets for a real-time flood forecasting system. It is licensed separately to waterRIDE™ FLOOD Manager.
Note: If you are using any netCDF4 based datasets, you must ensure that the netCDFv4 libraries are available. The can be downloaded from https://www.waterRIDE.net/Downloads/netCDF_v4.zip. Extract the netCDF_v4 folder to the same location as your wR_Flood_Console.exe.
You can configure a connection to console within waterRIDE FLOOD (Manager) by specifying the location of your wR_Flood_Console.exe file on the rainfall setup tab.
waterRIDE™ Forecast Console will:
•Collect rainfall/river gauge information and update relevant gauge layers
•Download gridded rainfall forecast surfaces from provider FTP sites
•Convert gridded rainfall forecasts into waterRIDE™ format
•Download dam outflow hydrographs from dam operator FTP sites
•Batch run multiple forecast projects
•Issue alerts
A Note on FTP Proxies [FTP PROXY CONFIGURATION]
waterRIDE™ Forecast Console supports connecting to an FTP server using:
•No proxy
•FTP proxy (in a variety of modes)
•FTP over HTTP Proxy
No proxy configuration settings are required if proxies are not used. If using FTP proxies, you will need to configure the type of proxy setup used in your organisation, along with required proxy server username/password/server/port. Please contact your IT department to determine which of the following proxt schemes have been configured. Valid values are 0 to 9. The default value is 0 which indicates that no proxy server is used. Supported proxy methods are as below. Note: The ProxyHostname is the hostname of the firewall, if the proxy is a firewall. Also, the ProxyUsername and ProxyPassword are the firewall username/password (if the proxy is a firewall).
ProxyType=0 (DEFAULT) - No Proxy Used
ProxyType=1 (SITE site)
USER ProxyUsername
PASS ProxyPassword
SITE Hostname
USER Username
PASS Password
ProxyMethod = 2 (USER user@site)
USER Username@Hostname:Port
PASS Password
ProxyType=3 (USER with login)
USER ProxyUsername
PASS ProxyPassword
USER Username@Hostname:Port
PASS Password
ProxyType=4 (USER/PASS/ACCT)
USER Username@Hostname:Port ProxyUsername
PASS Password
ACCT ProxyPassword
ProxyType=5 (OPEN site)
USER ProxyUsername
PASS ProxyPassword
OPEN Hostname
USER Username
PASS Password
ProxyType=6 (firewallId@site)
USER ProxyUsername@Hostname
USER Username
PASS Password
ProxyType=7
USER ProxyUsername
USER ProxyPassword
SITE Hostname:Port USER Username
PASS Password
ProxyType=8
USER Username@ProxyUsername@Hostname
PASS Password@ProxyPassword
ProxyType=9
ProxyUsername ProxyPassword Username Password
Configuring Forecast Console - General
Forecast console is configured using a windows .ini file with the same name as the console executable (wR_Flood_Console.ini). An example ini file is provided below with comments in bold.
[APPLICATION]
CommonLibraryFolder=..\Common relative path to the waterRIDE common folder (only if needed - eg using GDAL to convert a TAB file)
[ADMIN]
;All file paths are assumed to be relative to the Main Folder unless the full path is used,
; starting with a server name or drive letter
ForecastMainFolder=Z:\Forecasting\Forecast Project 1 a folder containing forecasting project files (*.vmmap etc). All RELATIVE paths should be relative to this folder
[FTP PROXY CONFIGURATION]
; User EITHER FTP proxy or HTTP Proxy
; Must be completed for relevant FTP PROXY
ProxyType=0 different FTP proxy management methods are available. Consult your IT department for the appropriate settings (refer above)
;ProxyUser=username
;ProxyPass=password
;ProxyPort=21
;ProxyHost=ftpproxy.com
;Must be completed for FTP over HTTP Proxy
;HTTPProxyUser=username
;HTTPProxyPass=password
;HTTPProxyPort=8080
;HTTPProxyHost=httpproxy
[GAUGE DATA]
RainfallGagFile=Gauge Data\Rain.gag relative path to rainfall gauge layer
RainfallDataSource=Enviromon\Enviromon-Rainfall.txt source of raw rainfall data (SQL, Enviromon, CSV etc)
RainfallDataType=Enviromon type of raw rainfall data (GagSql or Enviromon)
WaterLevelsGagFile=URBS\oakey\River.gag relative path to river level gauge layer
WaterLevelsDataSource=Enviromon\Enviromon-Levels.txt source of raw river level data (SQL, Enviromon, CSV etc)
WaterLevelsDataType=Enviromon type of raw rainfall data (GagSql or Enviromon)
RiverReadingsFormat=Level raw river level gauge data readings format (Level or Stage)
[PUBLISH]
;PublishFolder=..\PUBLISH
PublishFolder=Publish relative path to publish folder
[LOG]
LogFolder=..\CONSOLE_LOG relative path to log file
[DAM FLOWS] Configuration of forecast dam outflow FTP server
HostName=extftp.sunwater.com.au
Username=user1
Password=P@ssw0rd
LocalFolder=EXTERNAL FILES Local folder to save file(s) to
NumSourceFiles=1
SourceFile_1=RRDOutFlow.csv Path to files on FTP server
[FORECAST]
;Specifies the list of forecast batch script files to run in batch mode
Number=3 Number of forecasting batch scripts to run in batch mode
ScriptFile_1=..\Site1\Site1-RunAllForecast.txt
ScriptFile_2=..\Site2\Site2-RunAllForecast.txt Relative path to each script file
ScriptFile_3=Example-RunAllForecast.txt
[BOM RAIN] Collection of PAID Australian BoM forecast rainfall datasets from FTP site: ADFD, PME, Rainfields Radar, NowCAST, QPF
; Use entries/data sources as needed
HostName=ftp.bom.gov.au BoM FTP server
OR
HostName=z:\BoM\FcastData Path to local/network folder containing BoM raw rainfall datasets
Username=user
Password=pass
LocalFolder=BoM Rain\ Local folder to save data to
; AFDF Datasets
NumADFDSourceFiles=3
; Add each ADFD source (10%, 25% and 50% exceedance) as an incrementally numbered reference
ADFDSourceFile_1=adfd\IDQ71033_QLD_Precip50Pct_SFC.nc.gz
ADFDDisplayName_1=ADFD 50% a display label used to identify this grid when running a forecast (if not specified, the filename will be used)
ADFDSourceFile_2=adfd\IDQ71032_QLD_Precip25Pct_SFC.nc.gz
ADFDSourceFile_3=adfd\IDQ71031_QLD_Precip10Pct_SFC.nc.gz
;PME Datasets
PMEfolder=nwp4 PME folder on BoM FTP server
PMEprefix=IDYPME12.v3_1 Limits collection of PME files to those containing the specified string in the filename
PME_WRRfile=PME-Forecastrain.wrr Output filename for PME grid
MergeADFDPME_ADFDfile=IDZ71032_AUS_Precip25Pct_SFC.nc.gz ADFD grid file to merge with PME (legacy support only - no longer necessary)
MergeADFDPME_OutFile=ADFD_PME-merged.wrr Output name of merged ADFD/PME grid
RF3RadarMaxFileCount=30 the maximum number of files to retrieve (each step is stored as a separate file) - useful for retrieving "old" data if the internet goes down for an hour or two
; RAINFIELDS3 - Calibrated Radar
; Add each RAINFIELDS3 datasource as an incrementally numbered reference. Note most tags have the _XX suffix
RF3RadarFolder_1=radar Relative path to folder containing RAINFIELDS3 (QPE - RADAR) dataset for 1st Radar productID
RF3RadarProductID_1=IDR313AR.RF3 RAINFIELDS3 RADAR/QPE based ProductID code (single timesteps that will be merged into a single wrr)
RF3RadarProjection_1=356 RAINFIELDS3 output projection (waterRIDE code: 356 - MGA Zone 56, 355 = MGA Zone 55 etc)
RF3RadarDisplayName_1=Calibrated Radar an "easier" to understand reference for the data when running a forecast (if not specified, the filename will be used)
; RAINFIELDS3 - Merged RADAR + Rain Gauge
RF3RadarFolder_2=radar
RF3RadarProductID_2=IDR313MQ.RF3
RF3RadarProjection_2=356
; RAINFIELDS3 - QPF 12hr
RF3QPFFolder_1=radar
RF3QPFProductID_1=IDR313EA.RF3
RF3QPFProjection_1=356
RF3QPFDisplayName_1=QPF 12hr an "easier" to understand reference for the data when running a forecast (if not specified, the filename will be used)
; RAINFIELDS3 - QPF 2hr
;RF3QPFFolder_2=radar
;RF3QPFProductID_2=IDR66FA.RF3
;RF3QPFProjection_2=356
; Append mode toggling - RAINFIELDS3 toggle controlling appending of radar data to existing file (0 = false, -1 = true)
Note: It only makes sense to append radar based datasets in which the rainfall accumulation period matches the update frequency (eg IDRxxxMQ has a rainfall accumulation of 15mins with an update frequency of 15mins)
RF3RadarAppend_1=1
RF3RadarAppend_2=1
;Keep a rolling window of the last XX days of data when appending (default is 0 which means keep all data).
RF3RadarAppendWindowDays_1=7
RF3RadarAppendWindowDays_2=7
; Synchronise a local folder with an FTP folder (download from FTP, one way only)
; this will keep a local copy of the FTP folder, deleting any local files that do not appear on the FTP server
SyncFolder_1=data the folder on the FTP server to synchronise
SyncFolderLocal_1=local folder relative path (from forecast main folder) to the folder to be synchronised
SyncFolderPrefix_1=IDR313MQ.RF3 the prefix of the product to synchronise
[BOM PUBLIC ACCESS] Freely available rainfall and river gauge data from Australian BoM
HostName=ftp.bom.gov.au BoM FTP server
SourceFolder=/anon/gen/fwo Path on server to gauge data files
RainfallGagFile=gauges\rain.gag Relative path to rain gauges GAG layer
RainfallGAGPrefix=IDZ65900 Prefix of files containing rainfall data: IDZ65900 (15 min) or IDZ65901 (60 min)
WaterLevelsGagFile=gauges\rain.gag Relative path to river gauges GAG layer
WaterLevelsGAGPrefix=IDZ65910 Prefix of files containing rainfall data: IDZ65910 (15 min) or IDZ65911 (60 min)
[BOM SOIL MOISTURE]
;URL= URL prefix to filename. If left blank, defaults to http://www.bom.gov.au/jsp/awra/thredds/fileServer/AWRACMS/values/day/
SoilMoistureFolder=SoilMoisture Relative path to output folder for soil moisture grid
SoilMoistureLastXXDays=21 Only convert the last XXX days of data. This is designed to keep, say, a rolling 30day soil moisture grid updated daily
SoilMoistureOutFile=BoM_Soil_Moisture.wrr The desired output waterRIDE grid file. This can be an existing file, new file, or left blank. This file must reside (or will be created in the SoilMoisture folder, above)
SoilMoistureAppend=True If a valid output file is specified, any new soil moisture information will be appended to this file
[NETCDF GRIDDED RAIN FILES] Convert a folder of netCDF files from a single provider (BoM or NZ MetService)
;GridType = BOMADFD or BOMPME or METSERVICENZ Only a single providers netCDF files can be in the folder (BPMADFD or BOMPME or METSERVICENZ)
GridType=METSERVICENZ
SourceFolder= Relative path to folder containing source netCDF files (*.nc), If blank, defaults to MainProjectFolder
OutPutFolder= Relative path to destination folder for converted grids (*.wrr), If blank, defaults to MainProjectFolder
FilePrefix1=nz8kmN-ECMWF Use prefixes to force conversion of only the newest (by file date) netCDF files. The output name will be the prefix + .wrr
DisplayName1=Most Likely an "easier" to understand reference for the data when running a forecast (if not specified, the filename will be used)
FilePrefix2=nz8kmN-NCEP
DisplayName2=Upper Bound
FilePrefix3=nz8kmN-UKMO
OnlyConvertNewData=True only convert the file if the source data is NEWER than the output file (default is FALSE - always convert)
[WEATHERZONE RAIN] Download WeatherZone forecast rainfall grids (netCDF)
HostName=ftp.weatherzone.com.au FTP Hostname (use either FTP or HTTP) FTP mode will only download netCDF files if they are newer than what's in the LocalFolder
HostName=http://clients.weatherzone.com.au/ClientUserName/upload/WeatherZoneFolder/ Full HTTP URL string to folder containing netCDF files (use either FTP or HTTP)
Username=abc123
Password=p@ssword
LocalFolder=RainFall Grids Local folder to save data to
HostFolder=FTP Folder Folder on FTP site containing netCDF files (only needed for FTP connection - HTTP connections must define full URL to folder containing netCDF files)
RainGrid_1=folder\WeatherZone netCDF File 1 Any number of netCDF files to download from server. This should be the relative path to the file from the FTP root folder
DisplayName_1=Most Likely an "easier" to understand reference for the data when running a forecast (if not specified, the filename will be used)
RainGrid_2=folder\WeatherZone netCDF File 2
RainGrid_3=folder\WeatherZone netCDF File 3
[NOAA STORM SURGE] Download NOAA forecast storm surge levels (petss) VIA FTP
HostName=ftp.ncep.noaa.gov FTP hostname (if using FTP connection) OR
OR
HostName=http://ftp.ncep.noaa.gov HTTP server (if using HTTP connection)
Username= Leave blank
Password= Leave blank
LocalFolder=
SourceFolder=/pub/data/nccf/com/petss/prod Path to storm surge folder on FTP site OR
OR
SourceFolder=/data/nccf/com/petss/prod Path to date based petss folder on HTTP site (
petssMEANFileName=petss.t00z.mean.stormtide.est.txt Name of mean/median stormtide file in petss folder(s)
petssUPPERFileName=petss.t00z.e10.stormtide.est.txt Name of upper bound stormtide file in petss folder(s)
petssLOWERFileName=petss.t00z.e90.stormtide.est.txt Name of lower bound stormtide file in petss folder(s)
petssMEANGaugeLayer=NOAA Gauges.gag Gauge layer to store results
petssUPPERGaugeLayer=NOAA Gauges-Upr.gag
petssLOWERGaugeLayer=NOAA Gauges-Lwr.gag
[STEVENS INSTITUTE STORM SURGE] Download Stevens Institute forecast storm surge levels
UserName=username Provided by Stevens Institute
Password=password Provided by Stevens Institute
ObservedScriptURL=https://ssv.dl.stevens-tech.edu/adv/advisian_model_down.csv URL to customised download script
ForecastScriptURL=https://ssv.dl.stevens-tech.edu/adv/advisian_observed_down.csv URL to customised download script
LocalFolder=
GAGLayerObserved=StevensGauges-Observed.gag Gauge Layer containing observed gauge levels
GAGLayerForecastMean=StevensGauges-ForecastLikely.gag Gauge Layer containing expected (mean) gauge levels
GAGLayerForecastUpper=StevensGauges-ForecastUpper.gag
GAGLayerForecastLower=StevensGauges-ForecastLower.gag
; SYNC section allows synchronisation of a local folder to a folder on an FTP server. Files will be downloaded/deleted from the local folder as needed to match what is on the FTP server
[SYNC FOLDER 1] As many groups as required incrementing count for each new group (only FTP)
DownloadType=FTP Must be FTP or FTPS (Secure FTP)
HostName=ftp.bom.gov.au
Username=bomXXX
Password=XXYYZZ
Folder_1=adfd Folder on FTP to sync
LocalFolder_1=raingrids\adfd relative path to folder on local machine
FilePrefix_1=IDZ7103 only sync files with this prefix. Leave blank for all files.
Folder_2=radar Next folder on same FTP server
LocalFolder_2=raingrids\radar
FilePrefix_2=IDR313AR.RF3
Folder_3=radar
LocalFolder_3=raingrids\radar
FilePrefix_3=IDR313MQ.RF3
Folder_4=radar
LocalFolder_4=raingrids\radar
FilePrefix_4=IDR313EA.RF3
[DOWNLOAD FILES 1] As many groups as required incrementing count for each new group (either HTTP, HTTPS, or FTP)
DownloadType=HTTP General HTTP download - when a username/password is NOT required to download file(s)
FileName_1=http://www.waterride.net/wp-content/uploads/2018/02/18-02-February-Newsletter.pdf Full URL to file #1 - can be HTTP or HTTPS
FileName_1_OUT=~wR_Date~ ~wR_Time~ 18-02-February-Newsletter.pdf Output filename #1 - include the download date (~wR_Date) and time (~wR_Time~) at the start of the filename
LocalFolder= Local output folder relative to MainFolder
UnZipFile=True Unzip the file if it is a zip file (zip/gz)
DeleteFilesOlderThanDays=7 Delete files in the LocalFolder older than 7 days. Default is -1 (do not delete any files).
[DOWNLOAD FILES 2] Download specific files from an FTP server
DownloadType=FTP FTP/SFTP download mode
HostName=ftp.bom.gov.au must be specified
Username=user must be specified
Password=pass must be specified
LocalFolder=
FileName_1=adfd\IDZ71031_AUS_Precip10Pct_SFC.nc.gz relative path to file on FTP server from ROOT folder
FileName_2=adfd\IDZ71032_AUS_Precip25Pct_SFC.nc.gz
FileName_3=adfd\IDZ71033_AUS_Precip50Pct_SFC.nc.gz
UnZipFile=True Unzip the file if it is a zip file (zip/gz)
[DOWNLOAD FILES 3]
DownloadType=HTTPS Password protected HTTP or HTTPS file - when a username/password is required to download file(s)
Username=user must be specified
Password=pass must be specified
FileName_1=https://waterRIDE.net/test.csv URL of file #1
FileName_1_OUT=test.csv Local filename of file #1
FileName_2=https://waterRIDE,net/test2.csv
FileName_2_OUT=test2.csv
LocalFolder=
[DOWNLOAD FILES 4] Download files containing a specific string from an FTP server
DownloadType=FTP FTP/SFTP download mode
HostName=ftp.bom.gov.au must be specified
Username=anonymous must be specified
Password= must be specified
LocalFolder=
ServerFolder=anon\gen\fmo folder on server containing files to download
FileName_1=IDZ65900 search for all files containing this string in their name
FileName_1=IDZ65910 search for all files containing this string in their name
FileName_3=adfd\IDZ71033_AUS_Precip50Pct_SFC.nc.gz
[DOWNLOAD FILES 5] Download flood camera imagery and use JPG EXIF header to add image DATE/TIME as a prefix
DownloadType=HTTPS
FileName_1=https://public.disasterwatch-iotp.com.au/prospectpublicimages/997/Lavenders%20Bridge%20-%20Overview.jpeg
FileName_1_OUT=Lavenders Bridge.jpg
LocalFolder=Bellingen\Lavenders Bridge
PrefixEXIFdate=True Output name example 2021-11-03 23_14_02 Lavenders Bridge.jpg
[DOWNLOAD FILES 6] Download flood camera imagery and append time to output file using HTTP header information ("Filename" or "Date-Modified")
DownloadType=HTTPS
; Mount Stanley
FileName_1=https://eservices.somerset.qld.gov.au/floodcamimages/mountstanley.jpg
FileName_1_OUT=Mount Stanley.jpg
LocalFolder_1=Mount Stanley
; Gallinani Creek
FileName_2=https://eservices.somerset.qld.gov.au/floodcamimages/gallinani.jpg
FileName_2_OUT=Gallinani Creek.jpg
LocalFolder_2=Gallinani Creek
LocalFolder=NA Can be omitted if ALL LocalFolder_XX are specified
OverWriteExising=False only download the image if it is newer than an existing file. Useful where imagery changes irregularly or at varying frequency (eg more frequent during an event)
UseSystemFileName=True use the http header values for "Filename" or "Date-Modified" to append timestamp
DeleteFilesOlderThanDays=2
[DOWNLOAD FILES 7] Copy a file from a location (FULL PATH) to the output location (RELATIVE)
DownloadType=COPY
FileName_1=c:\data\ForecastRain.wrr FULL PATH of file to copy
FileName_2=c:\data\ForecastRain.cfg2 FULL PATH of file to copy
FileName_3=c:\data\ForecastRain.wrr.prjn FULL PATH of file to copy
LocalFolder=RainData Output folder (RELATIVE to project folder)
[DOWNLOAD FILES 8] Copy a file from a location (FULL PATH) to the output location (RELATIVE) and UnZIP its contents
DownloadType=COPY
FileName_1=c:\data\ForecastRain.zip FULL PATH of file to copy
LocalFolder=RainData Output folder (RELATIVE to project folder)
UnZipFile=True Unzip the file if it is a zip file (zip/gz)
[CONVERT GIS] convert a GIS file
FileName_1=DCDB_waterRIDE.TAB relative path to source file (could be a file that has been downloaded or SYNCed)
OutFileName_1=Converted Cadastre\DCDB.shp relative path and filename. File extension MUST be a valid GIS layer.
[TRIGGERS]
;Triggers are used to run a forecast batch file if a certain criteria is met. The format is TriggerName=trigger parameters. Multiple triggers can be set up and are processed sequentially.
; FILEDATEAUTORUN - checks the date/time of a specified file and runs the specified project if the file is newer than the last time the trigger was checked. Set the LastRunTime to 0.0 to execute the first time the trigger is checked (useful for checking a trigger)
; GAUGEEXCEEDAUTORUN - checks the value of the specified parameters for the specified gaugeID's to see if the current value exceeds the threshold. If the value is exceeded, the forecast batch script is executed. Any gauge parameter can be used. The batch script will be executed for as long as the parameter exceeds the threshold at any of the specified gauges.
TriggerName=FILEDATEAUTORUN,LastRunTime(double),"full or relative path of file to check date","full relative path to script file to run"
TriggerName=GAUGEEXCEEDAUTORUN,"full or relative path to GAG layer","full or relative path to script file to run",Time Window in days from NOW (- for past, + for future), "GaugeIDNameComms=Param,Threshold","GaugeIDNameComms=Param,Threshold",....
[UPLOAD FOLDER] uploads and entire folder to an FTP server
HostName=ftp.server.com
UseTLS=True set to true if the server requires/uses TLS encryption
UserName=userlogin
PassWord=Pass
LocalFolder=D:\BoM Gauge Data\Data\RainGrids\AUS\wrXY full/relative path to folder to upload
OnlyConvertNewData=True only upload if source file is newer than destination (false to always upload)
DestFolder=ADFD/Grids destination folder on FTP server for all files in source folder
[UPLOAD FILES] uploads individual files to an FTP server
HostName=ftp.server.com
UseTLS=True set to true if the server requires/uses TLS encryption
UserName=userlogin
PassWord=Pass
FileName1=D:\BoM Gauge Data\Data\RainGrids\AUS\SoilMoisture\sm_pct_2023.nc filename1 - full/relative path to file to upload - as many files as needed
OnlyConvertNewData1=True
DestFolder1=Downloads
FileName2=D:\BoM Gauge Data\Data\RainGrids\AUS\SoilMoisture\sm_pct_2022.nc
OnlyConvertNewData2=True
DestFolder2=Downloads
Forecast Batch Script Files
Batch script files contain a list of forecasting projects to run as a batch. There are two formats for the batch scripts:
- old format (simple text based format)
- new format (text based Windows INI format)
Old Format
A number of waterRIDE forecasting projects (*.vmmap) cab be executed as part of batch process by configuring a suitable forecasting batch script file. This is a simple text file cross referencing the full path of each forecasting project to execute and the forecasting mode to run that project in. Valid forecasting modes reflect those available when manually running the forecast with waterRIDE™ FLOOD Manager:
FallenRain : Run hydrology forecast using fallen rain only
Fallen+ManPred : Run hydrology forecast using fallen rain plus manually entered predicted rain (this mode cannot be run in Scheduled mode)
ManPred : Run hydrology forecast using manually entered predicted rain (this mode cannot be run in Scheduled mode)
Interpolated : Run hydrologic interpolation forecast using manually entered predicted rain
DamFlow : Run forecast using damflow CSV input
CurrentWL : Run forecasting using current levels at river gauges
PeakWL : Run forecasting using maximum levels at river gauges
GaugeTable : Run forecasting using gauge level/ARI table
TimeSeries : Run forecasting using time series gauge or table forecasts (extra parameter value of TIME if full time series forecast desired (default is peaks only)
Fallen+GridRain : Run hydrology forecast using fallen rain plus predicted gridded rainfall
GridPred : Run hydrology forecast using predicted gridded rainfall
A further line specifying the storm start date/time can be used if the user wishes to batch any forecasts involving fallen rain. This must appear on the first line in curled braces, and follow the standard full date time format in the following 19-character format:
{YYYY-MM-DD_HH:MM:SS}. Often this date would be specified when a system is put into operation for an event.
An example file is provided below to run two separate projects:
WATERRIDE {2017-05-23_12:00:00} first line must start with the text WATERRIDE and can also contain hard storm start time date in curled braces - time must be full format 19 characters.
; any comment lines must start with a ";"
"Z:\Forecasting\Real-TIme-WBNM.vmmap",FallenRain
"Z:\Forecasting\Real-TIme-URBS.vmmap",GridPred
"Z:\Forecasting\Real-TIme-URBS.vmmap",TimeSeries,TIME
New Format
Each forecasting project to execute must be setup as a new section, sequentially numbered from 1:
[PROJECT1]
ProjectFile=relative or absolute path to vmmap
ForecastType=Rain or Interpolated or DamFlow or CurrentWl or PeakWl or GaugeTable or TimeSeries
FallenRain=filename (not path) of GAG layer (fallen rain) or WRR file (gridded rain) - layer MUST be in project
PredictRain= MANUAL (for manual rain) or filename (not path) of WRR file (gridded rain) - layer MUST be in project
StartDate= number of days adjustment to current time (eg -5 for 5 days ago, 2 for in 2 days time, 0 for now)
TimeSeries=timestep in hours to save (-1 for peaks only - default)
InitLoss=initial loss (mm)
ContLoss=continuing loss (mm)
ManRainTotal=total rain for manual prediction (mm) (default=-1)
ManRainTime=time window for manual prediction (mm) (default=-1)
RainSensitivity=+/- percentage to apply to forecast rainfall (default=-1, not used)
TidalOverride=tidal override (m) (default=DELVAL(-9999.9) - not used)
PeakPeriod=hours to extract peak levels from (-1 for entire period) - DEFAULT = -1
DamOutFlow=dam outflows (DEFAULT = -1)
RunHydraulics=False if real-time hydrology configured and you do not wish to run hydraulics/interpolation [True by default]
RunFloodIntel=False if you wish to skip Flood Intelligence routines [True by default]
RunPublish=False if you want to skip publish routines [True by default]
[PROJECT2]
...
Forecast Console Modes of Operation
Console can be set to run continuously, using its own internal timers to trigger events, or run as a Windows scheduled task with suitable arguments.
In Continuous mode, timers can be started/stopped by clicking the relevant timer button. Gauge readings, gridded rainfall dataset, and file upload/download processes can also be manually run.
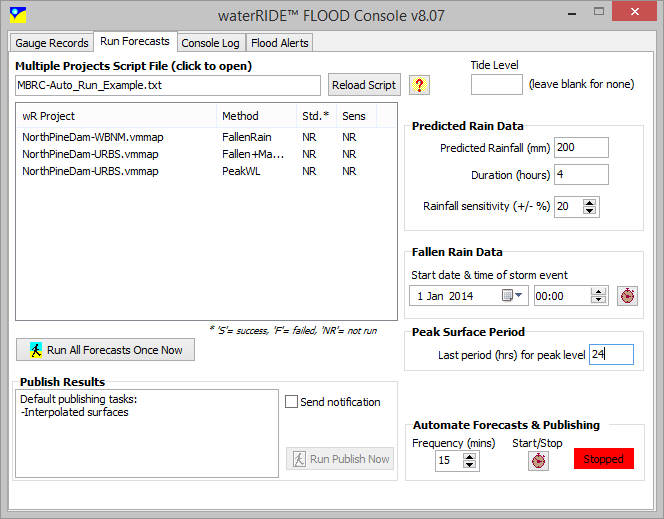
Forecasts can be run as a batch using a forecast batch script file (refer above). Batches are executed in the same manner as a manual forecast inside waterRIDE™ FLOOD Manager. As such, relevant input parameters including tide levels, predicted rain and time window of which to calculate the peak water level must be specified as global value for all batched runs. The start date of any fallen rain only system can be specified using the relevant datetime editor. Alternatively, this can be set in the forecast batch script file.
In Scheduled Mode, Console can be called from a batch file and run parameters used to control the tasks that should be executed. Not all forecast modes are compatible with auto-batch mode. The following parameters can be specified:
-rfc runs configured forecasts in forecast batch script
-ggr collects rain gauge data
-ggl collects river gauge data
-gmr collects met bureau forecast rainfall grids and storm surge levels (if collecting BoM products, this will collect ALL products. You can use the BoM codes below to specify products)
-gdf collects dam outflow forecasts
-download downloads file(s) as specified in DOWNLOAD FILE and Dam Flow sections
-upload uploads a folder as specified in UPLOAD FOLDER section
-uploadfiles uploads file(s) as specified in UPLOAD FILES section
-gsm collects BoM Soil Moisture grid
-bomADFD collects BoM ADFD product only (other products can be configured - this is useful if you use multiple BoM products that should be collected at different frequencies eg ADFD and QPF)
-bomPME collects BoM PME product only
-bomRADAR collects BoM Rainfields3 RADAR (QPE) products only
-bomQPF collects BoM QPF products only
-SYNC run synchronise processes only
-triggers run a check of any triggers
For example, the following command will collect river and rainfall gauge data:
wR_Flood_Console.exe -ggl -ggr
It may be worthwhile running multiple scheduled tasks to collect datasets at a suitable frequency, rather than collecting all data continually.
A Windows scheduled task can be setup as follows:
1) Open Task Scheduler and select Select Task Scheduler Library
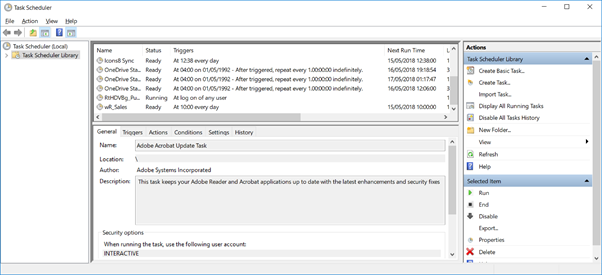
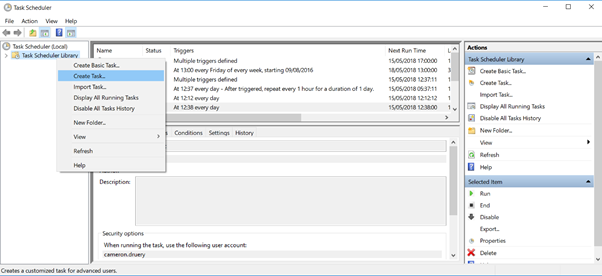
2) Right click on Task Scheduler Library and Create task
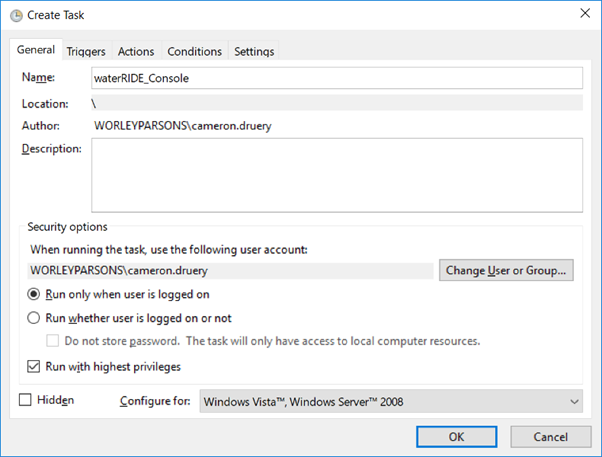
3) Give the task a name, and specify whether the task should be run when anyone is logged on or only when a specified user is logged on:
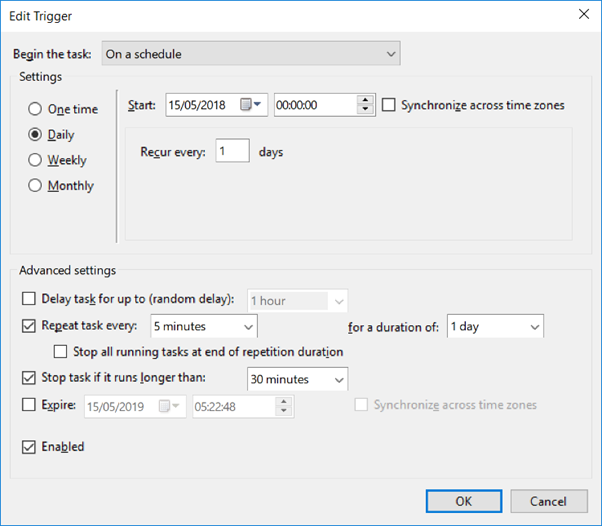
4) Go to the triggers tab, then create new and fill in your desired schedule. The below is an example for a 5 minute task execution starting at midnight, every day:
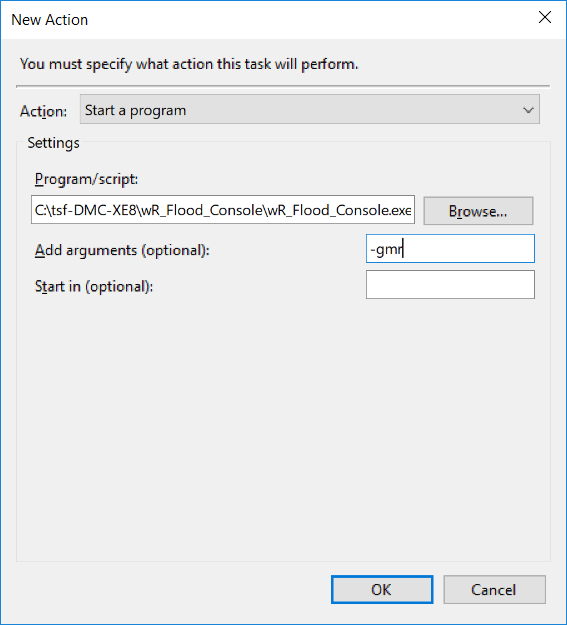
5) Go to the triggers tab, then create new, then browse to the location of your wR_Flood_console.exe application. The add as many arguments as required for the command line control of Console:
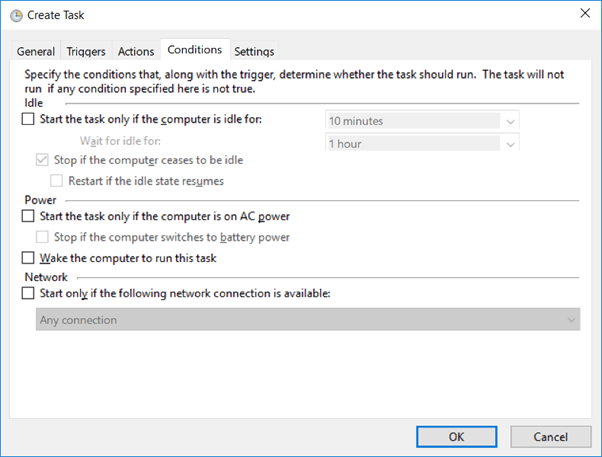
6) Go to the conditions tab and ensure that the task is set to run even if the computer is on battery:
7) Go to the settings tab and adjust settings to ensure the scheduled task behaves as you wish it to:
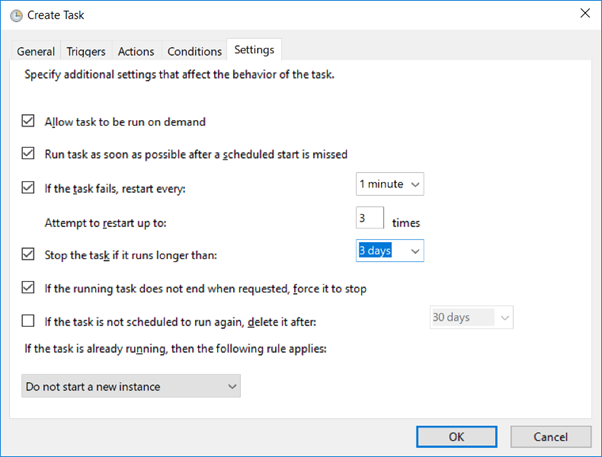
8) Click OK to save the task.