Enterprise Setup
WaterRIDE™ Enterprise provides a central repository of configuration settings, user names and their level of access, together with a list of central waterRIDE™ projects to manage and simplify user access to the data.
1) Establish a ‘wR_Enterprise’ folder on the network with controlled write access. This can be a folder anywhere on the network. Those with write permissions are considered ‘enterprise managers’, and can access the Enterprise configuration from from the file menu. All users must have read access to this folder as this is where the centralised settings are kept.
2) Follow the Enterprise "Client" setup routine on the machine of a user who is a enterprise manager (their account has read/write access to the enterprise folder).
3) The user with 'enterprise manager' permissions can now open waterRIDE in Manager/DATA Manager mode and browse to File->Setup->Enterprise Configuration, to establish/edit the Enterprise settings.
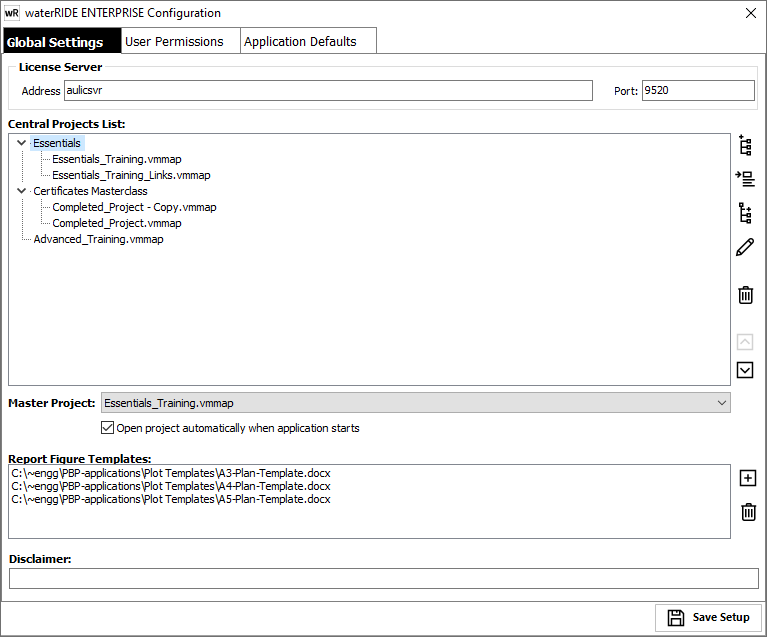
4) On the Global Settings tab, enter the following (as needed):
•License server address and port if running a standard (on-prem) license server, or locate the Web License Server file (*.weblic) if running from the waterRIDE.net web license server.
•Add files to the central projects list. These will appear on the Quick Start Dashboard under the "Central Projects" list when a user opens waterRIDE. Base level projects can be created using the new base project button (![]() ). Alternatively, projects can be grouped by creating a sub-menu (
). Alternatively, projects can be grouped by creating a sub-menu (![]() ) with sub-projects (
) with sub-projects (![]() ). The configuration above is reflected in the quick start Central Projects button on the below image. Grouping can be a neat way to organise a large number of projects. For ease of use, sub-menus can only be created from the base level (ie only one level of nesting is allowed).
). The configuration above is reflected in the quick start Central Projects button on the below image. Grouping can be a neat way to organise a large number of projects. For ease of use, sub-menus can only be created from the base level (ie only one level of nesting is allowed).
•Master Project (home project): If you want waterRIDE to always load with a specific project, select this as the Master Project and tick the box (in this case, the quick start dashboard, below, will not be displayed and the project will load immediately). Users can also access this project by clicking the Home button on the main interface. This is particularly useful if you have configured a Master Project that links to sub projects (eg it links to all separate flood studies carried out in a Council area using the direct linking capability).

•Add any Microsoft Word Report Figure templates. A copy of these files will be held in the users waterRIDE folder (eg C:\Users\juan.smith\AppData\Local\waterRIDE\PlotTemplates) for access when offline. When the user opens waterRIDE, the users folder is automatically synchronised with the enterprise folder. These templates will appear in addition to any user installed templates.
•Specify any disclaimer to appear on all views.
5) On the User Permissions tab, enter the following (as needed):
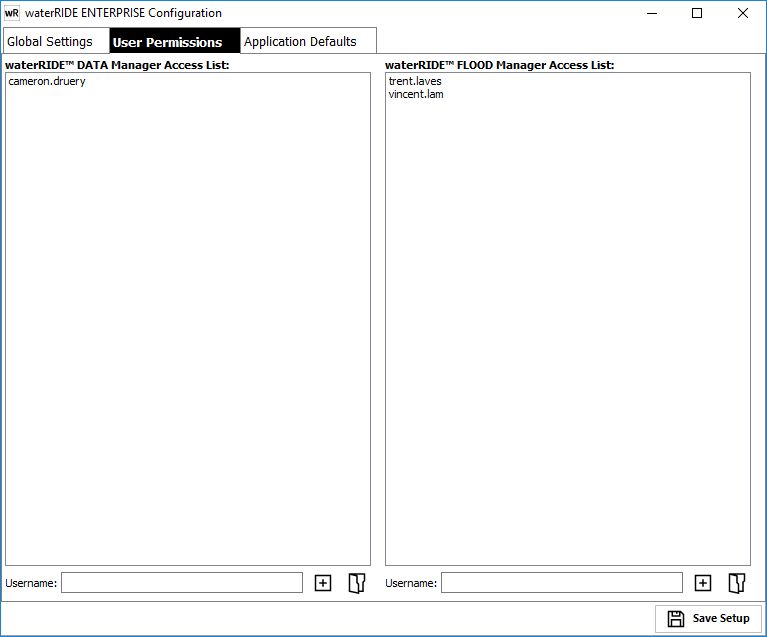
•Usernames to access DATA Manager and Manager. Access is cascading. If a user has access to DATA Manager, they will have access to Manager. Users not on either list will have access to Viewer only.
•Batch lists can be added from text files using the open button.
•Note that application mode user control when using waterRIDE CLOUD is managed from the User Administration page.
6) On the Application Defaults tab, enter the following (as needed):
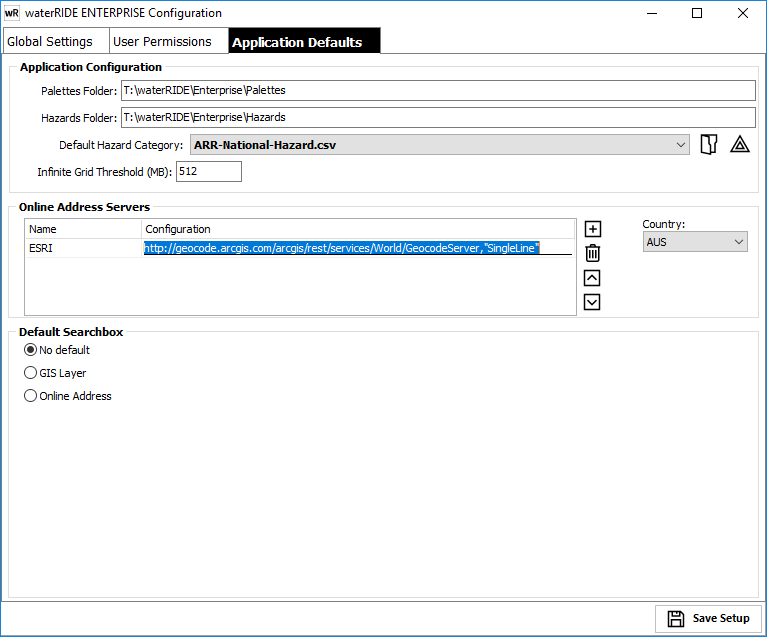
•Default palettes and hazards folder (for centralised management). Centralised hazards will collect hazards in the following priority: Enterprise folder then Users Folder, then Application folder. See Hazards Manager for more info.
•Default Hazard categories (appears on any "select hazards" form)
•Infinite grid threshold (generally left as blank which will default to 512MB).
•Online address servers. Add address servers using the ![]() button. Details of address servers are contained here. The default server is the server at the top of the list. A Country code can be specified to limit searches to a specific country if using the ESRI world geolocate server.
button. Details of address servers are contained here. The default server is the server at the top of the list. A Country code can be specified to limit searches to a specific country if using the ESRI world geolocate server.
•Default searchbox. This can include centralised GIS layers that may not be in any projects (ie the layer no longer needs to be in the project to enable searching).
7) On the 3rd Party Keys tab, enter any API keys as needed:
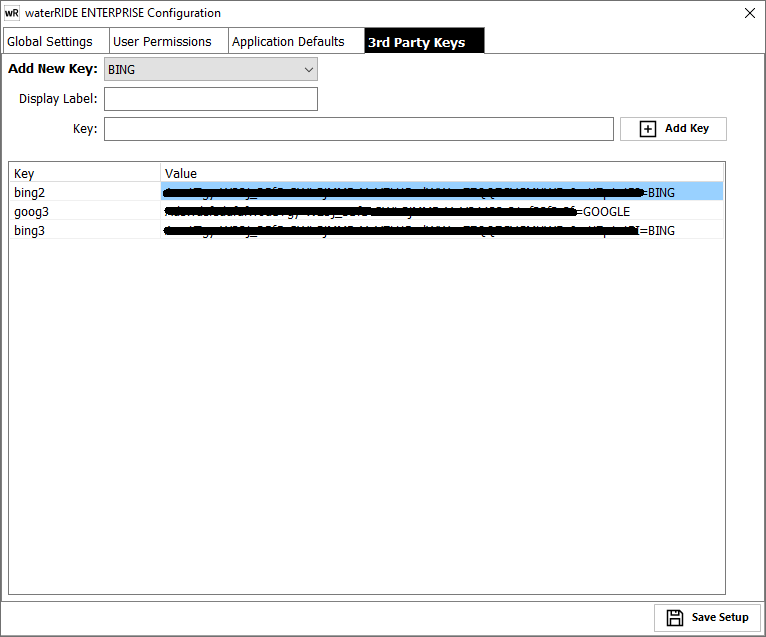
The key name for each API key will be presented to the user when needing to identify which key to use (ie the user will not see the actual API key value).
8) Click save. The settings will be stored in the wR_FLOOD.ini file in the enterprise folder specified.
An example enterprise configuration .INI file (wR_FLOOD.ini):
[LICENSE SERVER]
ServerHostname=127.0.0.1
ServerPortNumber=
[LOCALISATION]
; default = SI
;UnitsOfMeasurement=US Customary
[DATA MANAGER USERS]
; list of users allowed to access the Data Manager module if there is a licence
; Data Manager is a module requiring a Flood Manager Licence
UserName=T/F
...
[FLOOD MANAGER USERS]
; list of users allowed to launch Flood Manager if there is a licence available
; the default access is through Flood Viewer and no list is required
UserName=T/F
...
[CENTRAL PROJECTS]
; a list of prepared waterRIDE projects setup to access the organisation’s flood data
FullPathProjectName=T
...
[DATA MANAGER]
IniFile=Full path to wR_DATAManager.ini file
[APPLICATION]
HazardDefinitionsFolder=Hazards
PaletteFolder=Palettes
; threshold in base grid bytes when a WRR file works in infinite grid mode
MaxGridMemorySize=512000000
DefaultZoomLock=AUTO
[SEARCH]
; specify the full path to a GIS layer that DOES NOT need to be in any projects
DefaultLayer=cadastre.mif
DefaultField=PLANNUMBER
DefaultDisplayFields=CSID,CADID,LOTNUMBER,SECTIONNUMBER,PLANNUMBER,PLANLABEL
[GEOLOCATION SERVERS]
ESRI=http://geocode.arcgis.com/arcgis/rest/services/World/GeocodeServer,"SingleLine"
COUNTRY_wR=AUS
8) Configure the local wR_FLOOD.ini file on each client to point to the enterprise wR_FLOOD.ini file.