Background
User management in waterRIDE CLOUD is straightforward. Users are authenticated in a number of ways:
- Single Sign On
- Windows logon ("on-prem" only)
- waterRIDE Authentication (with 2FA options)
All users must have an account in waterRIDE that matches their logon name. This is used to define the authorisation process of what that user can do once they have access to waterRIDE (ie after authentication).
A note for "on-prem" installations
If you are running an "on-prem" installation and using Windows authentication, you will most likely not need to use the users full email address as their logon name (eg waterRIDE@worley.com would simply be waterRIDE). If this is the case, you should add a line to cloud installation config file (wR_FLOOD.ini), under the [APPLICATION] section:
[APPLICATION]
AllowNonEmailUsernames=True
![]() Click the user management button in the top right to:
Click the user management button in the top right to:
•Change your password (all users)
•Setup users and permissions (admin users)
•View currently connected users (including booting a user)
Change Password
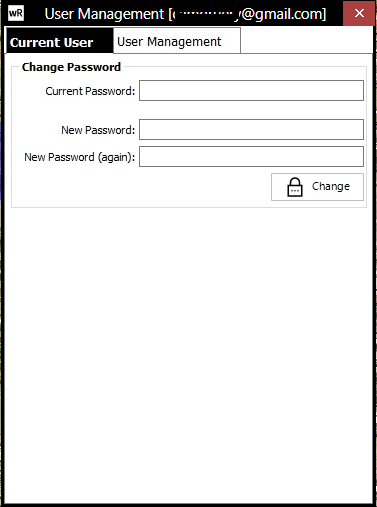
Enter your current password and your new password and click change.
User Management (Admin)
Only Admin users can access the User Management page. You may wish to have both an IT representative and your flooding team lead as Admin users.
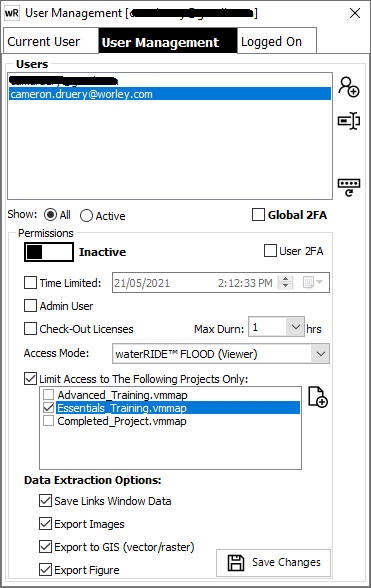
From the User Management page, an Admin user can:
•Turn on Global Two-Factor Authentication (2FA)
•Control access permissions (per user)
A new account can be added by clicking ![]() and entering a valid email address for the user. Account management (eg password resets) and notifications are via email, so a valid email address is essential. As part of the process, you will be prompted to have logon details automatically emailed to the new user. You will also be shown the new users initial password which can be copied if you would prefer to send an email yourself.
and entering a valid email address for the user. Account management (eg password resets) and notifications are via email, so a valid email address is essential. As part of the process, you will be prompted to have logon details automatically emailed to the new user. You will also be shown the new users initial password which can be copied if you would prefer to send an email yourself.
Once setup, you should set the new accounts' access permissions.
For "on-prem" installations, if Windows authentication is used then you can bypass the need to include full email addresses.
You can change the username for an existing account by clicking the ![]() button. Note that the account must be a valid email address.
button. Note that the account must be a valid email address.
Admin uses can force a reset of a users password by clicking the reset password button ![]() .
.
Global Two-Factor Authentication (2FA)
For added security, you can enable 2FA for all accounts. When enabled, after a user has successfully entered their username and password, they will be prompted for their 2FA code. This code is emailed to the users email address (username). The code must be entered within 5 minutes. If you do not wish to apply this for all users, 2FA can be applied to specific users in the user Access Permissions.
If you prefer to have users only use 2FA on a regular basis, then set the ![]() to a value greater than 0. For example, a value of 1 will require a successful 2FA login once a day. Setting it to 7 will require a successful 2FA login once a week. Leaving it at zero will enforce 2FA for every login.
to a value greater than 0. For example, a value of 1 will require a successful 2FA login once a day. Setting it to 7 will require a successful 2FA login once a week. Leaving it at zero will enforce 2FA for every login.
![]() Controls whether the selected account can access waterRIDE CLOUD. For auditing purposes, an account cannot be deleted. Instead, you can make an account inactive to prevent user access.
Controls whether the selected account can access waterRIDE CLOUD. For auditing purposes, an account cannot be deleted. Instead, you can make an account inactive to prevent user access.
User 2FA: Applies two factor authentication to the selected account. This is the same as Global 2FA except that it applies only to the select user. This can be useful for added security when allowing access from outside of your organisation.
![]() Click to reset the selected user's password.
Click to reset the selected user's password.
Time Limited: Allows you to create a time limited logon. If enabled, the users account will have access until the specified date/time. This is an ideal means of providing limited access to your waterRIDE CLOUD platform.
Admin User/Power User: Allows you to set elevated privileges for the current user. The following table sets these privileges:
Task |
Power |
Admin |
Standard |
User Management |
û |
ü |
û |
File Explorer |
ü |
ü |
û |
Lock/Unlock Projects |
ü |
ü |
û |
Enterprise Settings |
ü |
ü |
û |
Upload Certificates Template |
ü |
ü |
û |
Boot Users |
ü |
ü |
û |
Check-Out License: Enables the ability to checkout a license for use in Desktop (Classic) mode. You can also specify the maximum duration that a license can be checked-out for that user.
Access Mode: Sets the maximum application mode that the user can access (eg waterRIDE FLOOD (Manager) would enable access to both Manager and Viewer modes. waterRIDE FLOOD (Data Manager) would provide access to DATA Manager, Manager and Viewer modes).
Limit Access to the following projects only: If ticked, only allows the user to open the selected projects. The user will be unable to access the "Open" button. This setting is ideal for sharing a specific project(s) with external users. This only applies to users with Viewer level access (see access mode, above). Projects can be selected from the Central Projects list, or added manually. If only one project is selected, waterRIDE will automatically load that project after logon.
Data Extraction Options:
- Save Links Window Data: provides permission for the user to save (download) information in the links window to their machine (eg CSV of time series water levels, or a GIS layer of inspection points)
- Export Images: provides permission for the user to export (download) images of the view. Even if disabled, the user will still be able to take screen captures using their "print screen" key.
- Export to GIS (vector/raster): provides permission for the user to download GIS exports of your datasets (eg surfaces as ASCII grids, or water level contours as GIS polylines)
- Export Figure: provides permission for the user to create (download) report figures (if configured)
Currently Connected Users
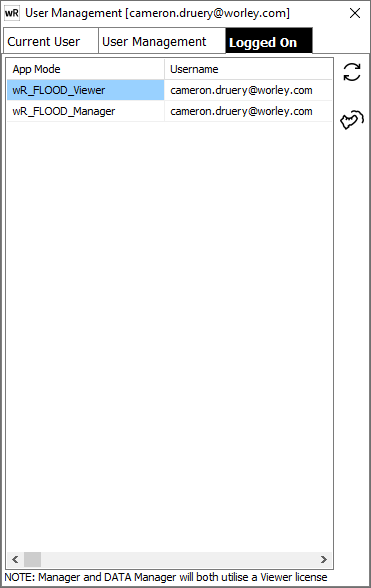
Note that a DATA Manager and Flood Manager license will also consume a Viewer license.
![]() To boot (logoff/logout) a connected user, click the icon. This will send a request to the session timer to log that user out and, as such, the overall process may take up to 60s to complete. Clicking refresh (
To boot (logoff/logout) a connected user, click the icon. This will send a request to the session timer to log that user out and, as such, the overall process may take up to 60s to complete. Clicking refresh (![]() ) will update the user list so that you can see if they have been disconnected. Note that this process will not save any projects that the user was/is working on.
) will update the user list so that you can see if they have been disconnected. Note that this process will not save any projects that the user was/is working on.