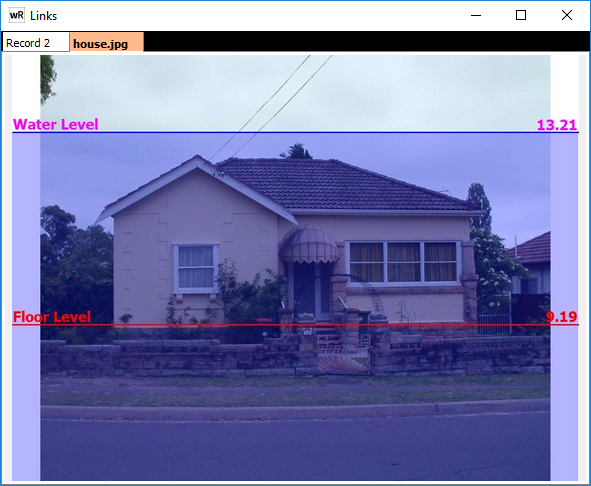
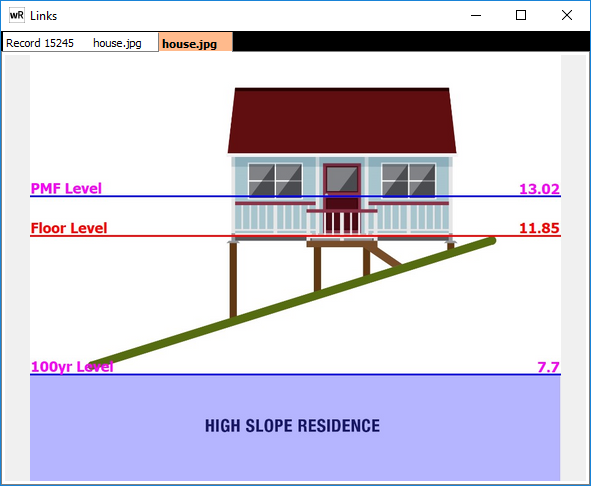
This option allows the user to setup the Scaled House Photos functionality in waterRIDE™. This can be used to automatically display a picture of each property. If the picture has been scaled, a flood level can be superimposed on the picture to provide a realistic visualisation of the active flood level at the property. Alternatively, you may wish to use a schematic of a property.
The tool requires a GIS layer with a field containing the name of a house photo file. If a relative filename is used, the house photo files should reside in a common folder.
A photo is positioned and scaled in vertical space by specifying two pixel rows where the RL's are known. waterRIDE can support two methods for using these known levels:
1.Floor/Eaves - Assumes that the floor level is known and either:
a. The eaves RL is known (similar to "known levels" below), or
b. The eaves RL can be inferred using the known floor level and a standard "floor to eaves" distance. This defaults to 2.4m but can be specified as a global value by the user.
2. Known Levels - Assumes that RL's are available for two known locations in the image. If only one RL is known for an image, but the image contains a means for identifying a second RL (eg a survey staff/rod is included in the picture), there are additional tools that can be used to help determine the RL of the second point.
Setup House Photos Links
Selecting the House Photos Setup tool opens the setup form. To configure House Photo settings a waterRIDE™ project must first be saved as the setup parameters are stored in the project vmini file.
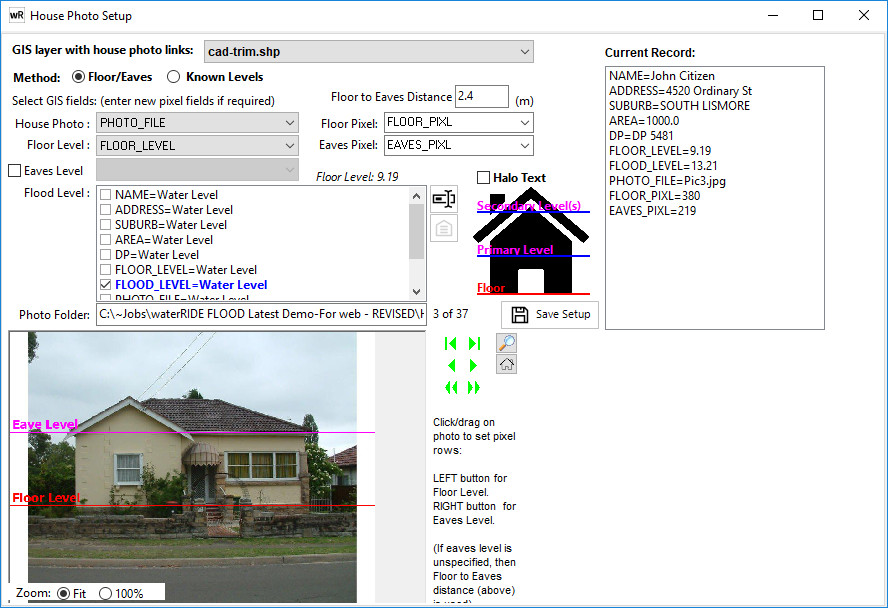
Floor/Eaves Method
Setup
This method is applicable when you have the RL of a property floor and, either the RL of the eaves or are able to infer the eaves RL using a standard floor to eaves height.
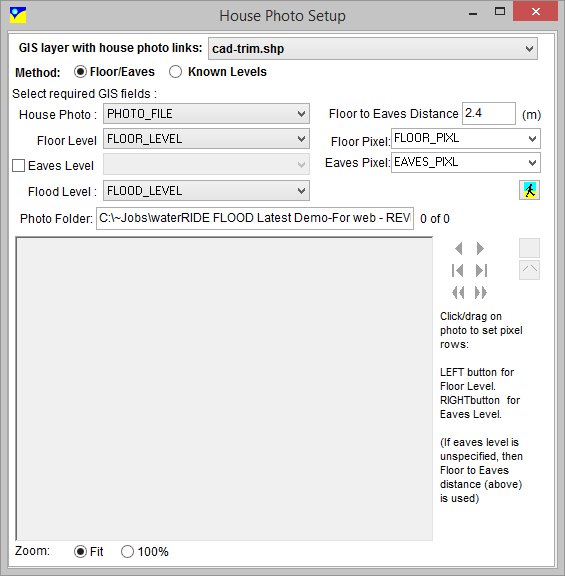
1) Select the GIS layer containing the house photo links.
2) Select the method as floor/eaves
3) Specify the GIS field containing the house photo filenames.
4) Specify the GIS field containing the property floor levels
5) Tick the box next to "Eaves Level" if you have the RL of eaves in one of the fields in the GIS layer. Otherwise, leave this unticked but enter the Floor To Eaves Distance in the relevant edit box. This value will be used for all properties.
6) Select the GIS field(s) containing the flood level(s) to superimpose (this may be populated using the GIS-Flood Integration tool, or automatically by tools such as the Flood Forecast tool or the ). The label for each flood level can be edited using ![]()
7) Specify the primary field by selecting it and then clicking the ![]() button. This is the field value that will be used to draw the "blue wash" on the image.
button. This is the field value that will be used to draw the "blue wash" on the image.
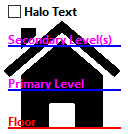
8) Specify the colours of the various lines/text by clicking on relevant part of the house image.
9) Click the photo folder edit box and select any photo file in the folder containing the house photos.
10) Select the GIS field to store the floor level pixel. Enter a new field name to create a new field.
11) Select the GIS field to store the eaves level pixel. Enter a new field name to create a new field.
12) Click the setup connections and load photos button ![]() to setup the connection to the photos. The settings will be written to the [PROPERTY FLOODING FIELDS] section of *.vmini file for the project.
to setup the connection to the photos. The settings will be written to the [PROPERTY FLOODING FIELDS] section of *.vmini file for the project.
The house photos have now been setup. Clicking on a property in the GIS layer (when active), will allow you to register the pixels of the floor and eaves (see below).
Scaling House Photos
Once the links to house photos have been setup, the user can scale the house photos to allow the flood level to be superimposed on the image.
Use the Next ![]() , Previous
, Previous ![]() , First
, First ![]() , Last
, Last ![]() , Next unscaled
, Next unscaled ![]() , Previous unscaled
, Previous unscaled ![]() buttons to navigate through all photos in the GIS layer.
buttons to navigate through all photos in the GIS layer.
Specify/edit the location of the floor on the photo by left clicking. Specify/edit the location of the eaves on the photo by right clicking.
The eaves and floor levels fields are automatically updated on any left/right click on the image.
![]() Search for a property using the standard Quick Search form.
Search for a property using the standard Quick Search form.
![]() Update the photo (jpeg) for the current property.
Update the photo (jpeg) for the current property.
Zoom: Adjust the zoom level of the image for coarse/refined reference placement. Either Fits the house photo to the window, or sets the zoom level to 100% (in which case scroll bars will likely appear).
Known Levels Method
Setup
This method is applicable when you know the RL's of two locations in a photo, or have the means of calculating a second RL using a scale within the image (such as measuring against a survey rod/staff).
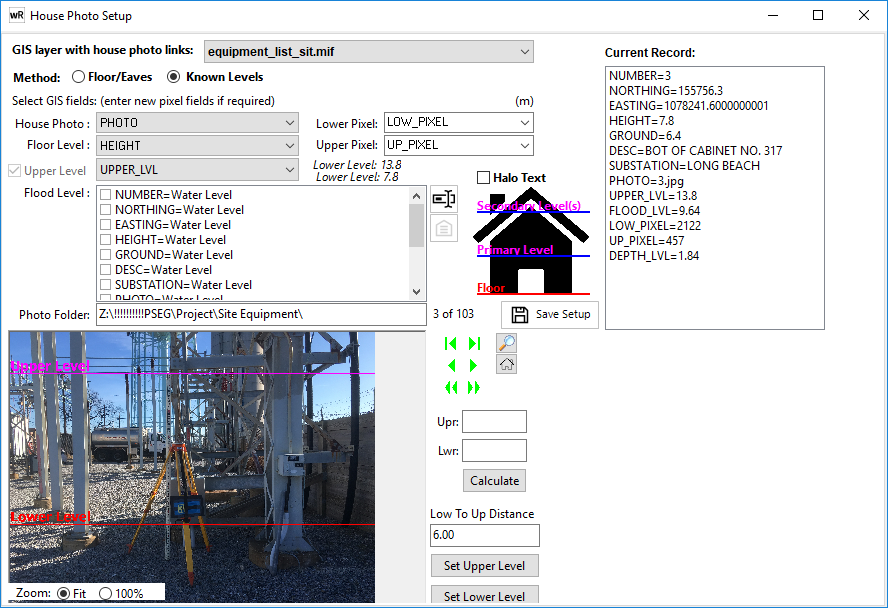
1) Select the GIS layer containing the photo links.
2) Select the method as Known Levels
3) Specify the GIS field containing the house photo filenames.
4) Specify the GIS field containing the known lower level
5) Specify the GIS field containing the known upper level
6) Specify the GIS field containing the flood level to superimpose (this may be populated using the GIS-Flood Integration tool, or automatically by tools such as the Flood Forecast tool or the ).
7) Click the photo folder edit box and select any photo file in the folder containing the house photos.
8) Select the GIS field to store the floor level pixel. Enter a new field name to create a new field.
9) Select the GIS field to store the eaves level pixel. Enter a new field name to create a new field.
10) Click the setup connections and load photos button ![]() to setup the connection to the photos. The settings will be written to the [PROPERTY FLOODING FIELDS] section of *.vmini file for the project.
to setup the connection to the photos. The settings will be written to the [PROPERTY FLOODING FIELDS] section of *.vmini file for the project.
The house photos have now been setup. Clicking on a property in the GIS layer (when active), will allow you to register the pixels of the upper and lower RL's (see below).
Scaling House Photos

Once the links to house photos have been setup, the user can scale the house photos to allow the flood level to be superimposed on the image.
Use the Next ![]() , Previous
, Previous ![]() , First
, First ![]() , Last
, Last ![]() , Next unscaled
, Next unscaled ![]() , Previous unscaled
, Previous unscaled ![]() buttons to navigate through all photos in the GIS layer.
buttons to navigate through all photos in the GIS layer.
Specify/edit the location of the lower on the photo by left clicking. Specify/edit the location of the upper RL on the photo by right clicking. If either RL is not known, it can be set as a distance either "above the lower RL", or "below the upper RL". In this case, enter the "real-world" distance between lower and upper locations and click either set upper level or set lower level to calculate and update the relevant GIS field value. To provide further assistance, if your image contains a survey staff (as in the above image) or similar, you can enter the staff readings for the upper and lower locations, click calculate and have the upper to lower distance calculated for you (after which you could then click set upper/lower level).
The upper and lower levels pixel fields are automatically updated on any left/right click on the image.
![]() Search for a property using the standard Quick Search form.
Search for a property using the standard Quick Search form.
![]() Update the photo (jpeg) for the current property.
Update the photo (jpeg) for the current property.
Zoom: Adjust the zoom level of the image for coarse/refined reference placement. Either Fits the house photo to the window, or sets the zoom level to 100% (in which case scroll bars will likely appear).